Data
| Type/Class:
|
Dimensions:
|
Decks:
|
Armament:
|
Rigging:
|
Crew:
|
German Cargo Windjammer
("Flying P-Liner")
|
Steel hull
Length: 147m
Width: 16,34m
Height: 68m
|
Stepped Deck with an "island" in the middle of the ship
poop, lower aft deck, island, lower fore deck and forecastle
|
none
|
5 masted full rigger
6-6-6-6-6 yards (fore-main1-main2-main3-jigger)
4-3-3-3-1 staysails
|
40-50
|
History
Designer: Georg W. Claassen
Built: Joh. C. Tecklenborg, Geestemünde, 1902
Expected life span: 30 years. But she survived only 8 years!
1902-1910: Cargo Routes between Germany and Chile, South America. Making record breaking journeys, she was also the fastest cargoes of her time!
She was THE ultimate "Flying P-Liner".
1910, November: on her 14th outbound voyage, she was rammed by British cross-channel steamer Brighton south of Newhaven near Dover, destroying the entire fore rigging,
and thus, her ability to steer savely any longer. Shw was too big to be saved by a large number helping steam tugs from Dover,
and in the following storm, the Preussen stranded and the hull broke apart at Crab Bay, and so had to be abandoned.
Some of her wreckage can still been seen there today.
Sources for Research
Hamechers book "Preussen - Königin der Meere" (Queen of the Seas), which has been reissued several times,
contains the most comprehensive collection of contemporary photographs, even some plans, and plenty of information,
especially about all her voyages. The German text also refects the "atmosphere" of the people in that era.
Unfortunately, as far as I know, it has never been translated to English or another language.
Some pictures of the Preussen reappear in every general book on sailing ships, for obvious reasons, but none of those books I know has information not been mentioned
by Hamecher.
Today in the age of the internet, some other sources opened their archives like the State Library of Victoria, the Malcolm Brodie shipping collection.
|
Reconstructions
The Rigging
|
The Preussen has a typical full rigging of a German Windjammer of the last generation:
6 yards on all 5 masts
Staysails on the bowsprit and between the masts.
|
The Standing Rigging
|
|
Bowsprit
[Bugspriet]
|
Fore Mast
[Fockmast]
|
Main Mast 1
[Großmast]
|
Main Mast 2
[Mittelmast]
|
Main Mast 3
[Achtermast,
Hauptmast,
Laeiszmast]
|
Mizzen Mast
[Kreuzmast]
|
Topgallant Mast
|
|
- 1 Jacob ladder abaft the mast
- 1 royal stay
- 2+2 backstays
|
- 1 Jacob ladder abaft the mast
- 1 royal stay
- 2+2 backstays
|
- 1 Jacob ladder abaft the mast
- 1 royal stay
- 2+2 backstays
|
- 1 Jacob ladder abaft the mast
- 1 royal stay
- 2+2 backstays
|
- 1 Jacob ladder abaft the mast
- 1 royal stay
- 2+1 backstays
|
Topmast
|
|
- 4 shrouds
- 1 topstay
- 2+3 backstays
- 2+2 backstays
|
- 4 shrouds
- 1 topstay
- 2+3 backstays
|
- 4 shrouds
- 1 topstay
- 2+3 backstays
|
- 4 shrouds
- 1 topstay
- 2+3 backstays
|
- 4 shrouds
- 1 topstay
- 2+2 backstays
|
Lower Mast
|
- 2 steel water stays
- 3 steel guys
|
|
|
|
|
|
The Running Rigging
|
|
Bowsprit
[Bugspriet]
|
Fore Mast
[Fockmast]
|
Main Mast 1
[Großmast]
|
Main Mast 2
[Mittelmast]
|
Main Mast 3
[Achtermast,
Hauptmast,
Laeiszmast]
|
Mizzen Mast
[Kreuzmast]
|
Royal Sails
6th yard
|
|
Fore Royal
- 1 Halyard
- 2 fixed Topping Lifts
- 2 Sheets
- 2 Clewlines
- 4 Buntlines
light royals: 2 B.
- 2 Braces
|
Main 1 Royal
- 1 Halyard
- 2 fixed Topping Lifts
- 2 Sheets
- 2 Clewlines
- 4 Buntlines
light royals: 2 B.
- 2 Braces
|
Main 2 Royal
- 1 Halyard
- 2 fixed Topping Lifts
- 2 Sheets
- 2 Clewlines
- 4 Buntlines
light royals: 2 B.
- 2 Braces
|
Main 3 Royal
- 1 Halyard
- 2 fixed Topping Lifts
- 2 Sheets
- 2 Clewlines
- 4 Buntlines
light royals: 2 B.
- 2 Braces
|
Jigger Royal
- 1 Halyard
- 2 fixed Topping Lifts
- 2 Sheets
- 2 Clewlines
- 2-3 Buntlines
light royals: 2 B.
- 2 Braces
|
Upper Topgallant Sails
5th yard
|
|
Fore Upper Topgallant
- 1 Halyard
- 2 fixed Topping Lifts
- 2 Sheets
- 2 Clewlines
- 4 Buntlines
- 2 Braces
|
Main 1 Upper Topgallant
- 1 Halyard
- 2 fixed Topping Lifts
- 2 Sheets
- 2 Clewlines
- 4 Buntlines
- 2 Braces
|
Main 2 Upper Topgallant
- 1 Halyard
- 2 fixed Topping Lifts
- 2 Sheets
- 2 Clewlines
- 4 Buntlines
- 2 Braces
|
Main 3 Upper Topgallant
- 1 Halyard
- 2 fixed Topping Lifts
- 2 Sheets
- 2 Clewlines
- 4 Buntlines
- 2 Braces
|
Jigger Upper Topgallant
- 1 Halyard
- 2 fixed Topping Lifts
- 2 Sheets
- 2 Clewlines
- 3-4 Buntlines
- 2 Braces
|
Lower Topgallant Sails
4th yard
|
|
Fore Lower Topgallant
- no Halyard, fixed rack
- 2 Sheets
- 2 Clewlines
- 4 Buntlines
- 2 Braces
|
Main 1 Lower Topgallant
- no Halyard, fixed rack
- 2 Sheets
- 2 Clewlines
- 4 Buntlines
- 2 Braces
|
Main 2 Lower Topgallant
- no Halyard, fixed rack
- 2 Sheets
- 2 Clewlines
- 4 Buntlines
- 2 Braces
|
Main 3 Lower Topgallant
- no Halyard, fixed rack
- 2 Sheets
- 2 Clewlines
- 4 Buntlines
- 2 Braces
|
Jigger Lower Topgallant
- no Halyard, fixed rack
- 2 Sheets
- 2 Clewlines
- 4 Buntlines
- 2 Braces
|
Upper Top Sails
3rd yard
|
|
Fore Upper Topsail
- 1 Halyard
- 2 fixed Topping Lifts
- 2 Sheets
- 2 Clewlines
- 5 Buntlines
- 2 Braces
|
Main 1 Upper Topsail
- 1 Halyard
- 2 fixed Topping Lifts
- 2 Sheets
- 2 Clewlines
- 5 Buntlines
- 2 Braces
|
Main 2 Upper Topsail
- 1 Halyard
- 2 fixed Topping Lifts
- 2 Sheets
- 2 Clewlines
- 5 Buntlines
- 2 Braces
|
Main 3 Upper Topsail
- 1 Halyard
- 2 fixed Topping Lifts
- 2 Sheets
- 2 Clewlines
- 5 Buntlines
- 2 Braces
|
Jigger Upper Topsail
- 1 Halyard
- 2 fixed Topping Lifts
- 2 Sheets
- 2 Clewlines
- 4 Buntlines
- 2 Braces
|
Lower Top Sails
2nd yard
|
|
Fore Lower Topsail
- no Halyard, fixed rack
- 2 Sheets
- 2 Clewlines
- 4 Buntlines
- 2 Braces
|
Main 1 Lower Topsail
- no Halyard, fixed rack
- 2 Sheets
- 2 Clewlines
- 4 Buntlines
- 2 Braces
|
Main 2 Lower Topsail
- no Halyard, fixed rack
- 2 Sheets
- 2 Clewlines
- 4 Buntlines
- 2 Braces
|
Main 3 Lower Topsail
- no Halyard, fixed rack
- 2 Sheets
- 2 Clewlines
- 4 Buntlines
- 2 Braces
|
Jigger Lower Topsail
- no Halyard, fixed rack
- 2 Sheets
- 2 Clewlines
- 4 Buntlines
- 2 Braces
|
Lower Sails
lower yard
|
|
Fore Course
- (fixed in a rack)
- 2 Topping Lifts
- 2 Sheets, 2 Tacks
- 2 Clewlines
- 2 Leechlines
- 6 Buntlines
- 2 Braces
|
Main Course 1
- (fixed in a rack)
- 2 Topping Lifts
- 2 Sheets, 2 Tacks
- 2 Clewlines
- 2 Leechlines
- 6 Buntlines
- 2 Braces
|
Main Course 2
- (fixed in a rack)
- 2 Topping Lifts
- 2 Sheets, 2 Tacks
- 2 Clewlines
- 2 Leechlines
- 6 Buntlines
- 2 Braces
|
Main Course 3
- (fixed in a rack)
- 2 Topping Lifts
- 2 Sheets, 2 Tacks
- 2 Clewlines
- 2 Leechlines
- 6 Buntlines
- 2 Braces
|
Mizzen Course
- (fixed in a rack)
- 2 Topping Lifts
- 2 Sheets, 2 Tacks
- 2 Clewlines
- 2 Leechlines
- 4-6 Buntlines
- 2 Braces
|
Stay Sails
Fore and Aft Sails
|
Fore Top Staysail
- 1 Halyard
- 1 Downhaul
- 2 Sheets
Jib
- 1 Halyard
- 1 Downhaul
- 2 Sheets
Outer Jib
- 1 Halyard
- 1 Downhaul
- 2 Sheets
Flying Jib
- 1 Halyard
- 1 Downhaul
- 2 Sheets
|
Main 1 Top Staysail
- 1 Halyard
- 1 Downhaul
- 2 Sheets
Main 1 Topgallant Staysail
- 1 Halyard
- 1 Downhaul
- 2 Sheets
Main 1 Royal Staysail
- 1 Halyard
- 1 Downhaul
- 2 Sheets
|
Main 2 Top Staysail
- 1 Halyard
- 1 Downhaul
- 2 Sheets
Main 2 Topgallant Staysail
- 1 Halyard
- 1 Downhaul
- 2 Sheets
Main 2 Royal Staysail
- 1 Halyard
- 1 Downhaul
- 2 Sheets
|
Main 3 Top Staysail
- 1 Halyard
- 1 Downhaul
- 2 Sheets
Main 3 Topgallant Staysail
- 1 Halyard
- 1 Downhaul
- 2 Sheets
Main 3 Royal Staysail
- 1 Halyard
- 1 Downhaul
- 2 Sheets
|
Mizzen Top Staysail
- 1 Halyard
- 1 Downhaul
- 2 Sheets
Topgallant or Royal staysails here not reported.
Spanker
- 1 Throat Halyard, 1 Peak Halyard
- 2 Gaff Vangs
- 1 Gaff Outhaul, 1 Gaff Inhaul
- 1 Boom Outhaul, 1 Boom Inhaul
- 2 Sheets
- 2 Brails
|
|
These are the lines to be belayed ...
Belaying Positions
|
As far as I know, there is no original belaying scheme preserved.
So after all, everything that can be said today about her belaying schemes is some sort of sophisticated guess ...
There is even no reliable modellers belaying plan available. So I make my own research for this: I take the only copy of an
original belaying plan I have (of the "Pamir") and use that as a pattern.
Luckily, there ARE some rare good photos that can be used for reconcstruction.
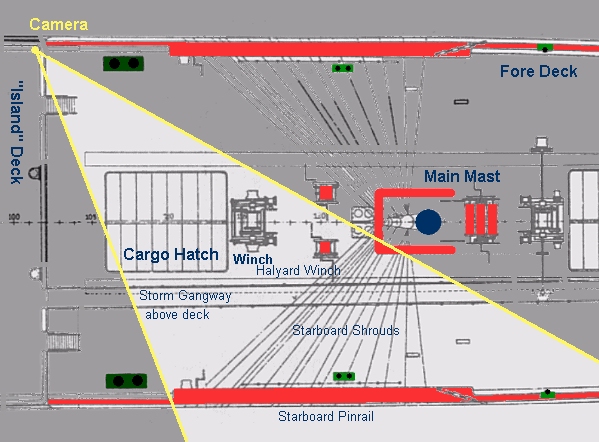
The most interesting picture (from Hamechers book) is this one, taken in ca. 1905:
we are looking to starboard forward, on the fore lower deck of the Preussen, under full sails:
The comment in the book says only: "Hatch, Gangway, a part of a Lower Sail and a Staysail.
The comparison with the people working on the rails displays the sizes of the sails very well."
So it does not tell You WHERE exactly that was. Not even the author Hamecher seems to have known that!
(And the landlubber is impressed for 3 seconds and then walks away ...)
But with the deck plan of the Preussen, it can be exactly reconstructed, whithout any doupt, where this picture has been taken from:
namely, from the "island" deck to starboard forward, looking at the
shrouds and the belaying pinrail of the main mast 1 (Großmast). So the photographer saw the Main Course 1, and the Main 2 Topstaysail.
There is a chance to mix this image up with a picture of the Fore Mast, which is within a very similar layout of the deck fittings, but if You
take a look at details, You can find the right place, reading the deck plan. Here, especially the cargo winch before the hatch helped me to find the spot.
But this picture reveals a LOT more than this: when You enlarge it, You can COUNT the pins on the rails, and SEE
the lines going to the pins.
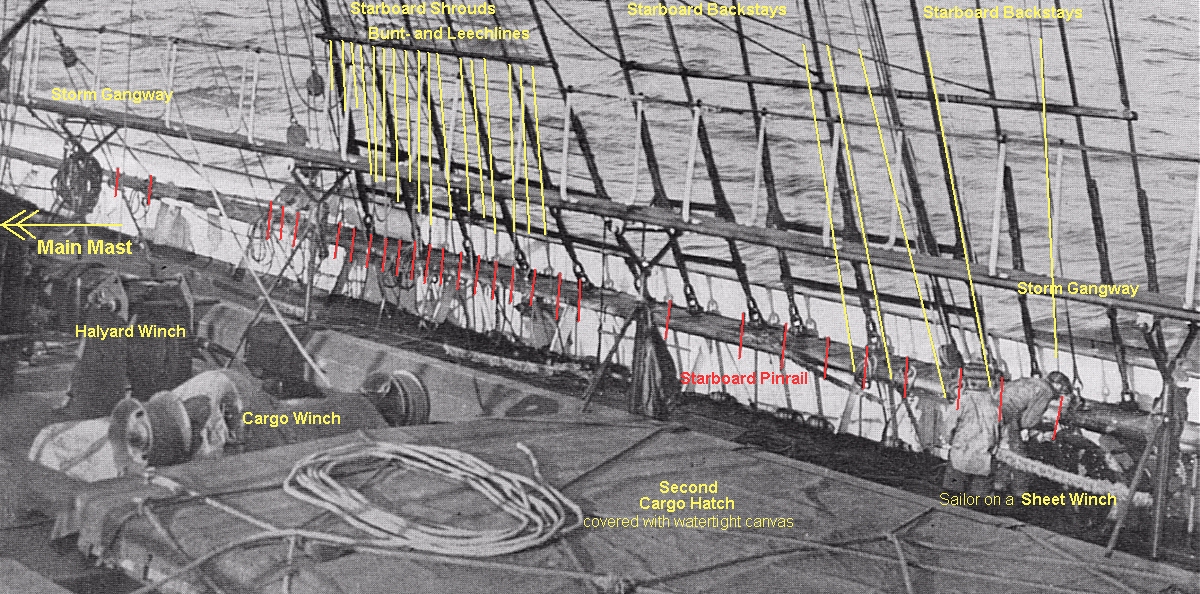
This is a key picture to reconstruct the running rigging of the Preussen! Almost EVERY DETAIL of around the rails - including the white paint inboards - can be seen in this picture,
provided You are familiar with a rigging of a German Windjammer ...
The German Flying P-Liners follwed a well defined pattern, that is even being used today on the surviving Windjammers, like Sedov and Kruzenshtern (ex-Padua):
... that was not the final version; the clewlines are missing!
|
So THIS can be reconstructed, using the picture and the patterns:
Some details are still unclear, because the buntline pins are very densed together under the 6 shroud lines,
and in case of an empty pinrail hole with no pin in it; obviously, it was a habit to take pins away where they were never used.
So, my count here can still not be reliable. But, the pattern of the buntlines leading down alltogether under the 6 shroud lines, is visible.
Here, there is room for speculation, that cannot be determined using the rare pictures, that also have no "metadata": we only see some lower sails, but were
all other sails really set? All 6 yards? Or did they take down a Royal Yard (for a repair at sea or such), because, counting all the buntlines at the shrouds,
they look too few: I count 17, I would expect 6*4 [6 sails by (1 clewline + 1 leechline + 2 buntlines)]= 24,
for the number of lines used, as we know from the sail plan. It could also be that these lines are missing, when a sail is under repair,
and all its lines are of course reeved out then. We do not know those circumstances.
But what we can see is this: the ship is under full canvas, sailing steadily, and a single lown sailor trims the Main Course sheet on the rail winch.
As the sails are set, the bunt- and leechlines are cast off, and most of them are not even longer belayed on their pins, they hang loose
through the thimble batten attached to the shrouds; Only a few lines are actually belayed: those are the 3 upper Fore Braces (lower and upper topgallant and royal),
leading down along the starboard backstays.
OK, so I think, this challenging riddle is solved.
And this arrangement is also valid for all the other masts, symmetric on port and starboard; just the last mast, no.5, the Jigger Mast, is
a little different, as always. But there are no original pictures of its pinrails.
|
I scanned all some 50 printed pictures of Hamechers book and enlarged them to find more details, the same way as I did for the picture above (which was THE key picture, by the way).
And then I went on
making my own belaying scheme, which I believe, comes close to reality (click on the thumbnail picture to load the full image):
|
|
cropped.jpg)